Langsung ke konten utama

Hands on Xamarin Platform Pipeline - Develop - Add authentication using Azure Active Directory

After creating an offline application following the previous post.
Now, we will start convert our offline application to a connected one using Microsoft Azure tools. In this post we'll add authentication using Azure Active Directory.

Application Creation on Azure Active Directory

To do this, login to https://manage.windowsazure.com and in case you don't have Azure Subscription a trial can be requested. Then, click on Active Directory as shown in the image below.
Select an Active Directory, navigate to Applications tab, click ‘Add‘ button then select ‘Add an application my organization is developing‘.
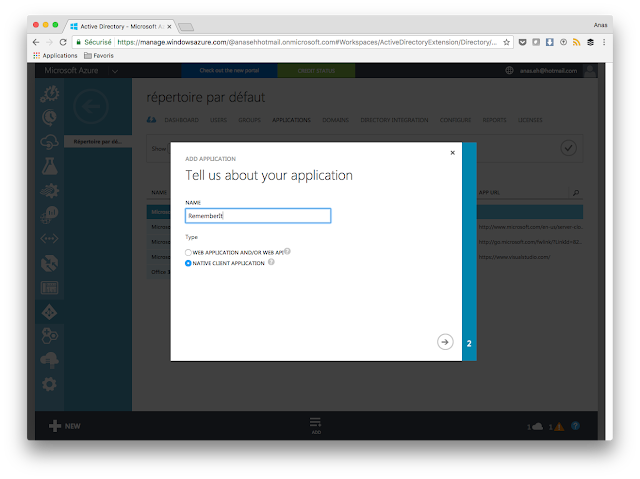
Choose an application name and make sure to select ‘Native Client Application‘ as type of application.
On the final screen, provide the ‘Redirect URI‘ then validate the application creation.
Once the app is created, navigate to ‘Configure‘ tab then write down the ‘Client ID’ that we’ll use later.

User Creation on Active Directory

In Active Directory main screen, navigate to Users tab, click on Add User button then chose a user name, in my case the user name shall be: test@anasehhotmail.onmicrosoft.com
Fill in some information about the user.
At the last step generate a temporary password that we can use for the first authentication in order to chose the final password.

Update the mobile Application

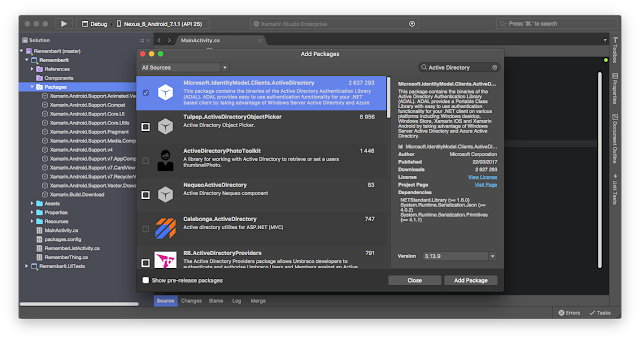
Add the package named Azure Active Directory Authentication Library (Azure ADAL) to the application.
Add a button to the Main.axml layout, we can use the Android graphical designer.
In the MainActivity class add the following constants.

Now, invoke the authentication process then save the result to authResult variable.

Finally, override the OnActivityResult method to get the authentication result.

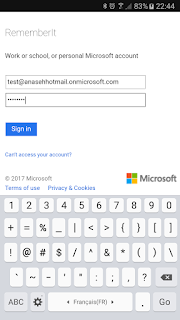
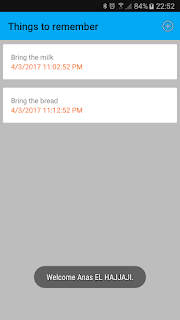
Below some screenshots.
 

Complete source code can be found on Github.

See you soon!

Komentar

Postingan populer dari blog ini

Android Tutorial: Use LeakCanary to detect memory leaks

Overview The memory leak can be a headache to detect and to resolve, small memory leaks can be hidden and may be seen after a long usage of the application and hunting memory leaks is not a simple task. In this tutorial we will create a leaked application and we will use the LeakCanary library to detect the memory leak. Step 1: add the LeakCanary dependency to the application Modify the app/build.gradle to add the LeakCanary dependency as follows: Step 2: Extend and configure the Application class We need to call LeakCanary.install in onCreate method: Step 3: Create a leaked activity For this we will create a singleton class that saves the context: Then, the main activity (leaked one), will use the singleton and then we'll go to a new activity: Then, in the new activity we'll call System.gc to force the garbage collector in order to accelerate the analysis. Step 4: Retrieve the analysis result A nice notification can be shown: The result can be retrieved from logcat: Source c...

QR-Code Generator - Library

In this Post, I introduce my new Gradle Library. This Library is used to Generate QR Code Automatically for our specified input. How to Import the Library: Gradle: compile 'androidmads.library.qrgenearator:QRGenearator:1.0.0' Permission: <uses-permission android:name="android.permission.WRITE_EXTERNAL_STORAGE"/> How to use this Library: After importing this library, use the following lines to use this library. The following lines are used to generated the QR Code // Initializing the QR Encoder with your value to be encoded, type you required and Dimension QRGEncoder qrgEncoder = new QRGEncoder(inputValue, null, QRGContents.Type.TEXT, smallerDimension); try { // Getting QR-Code as Bitmap bitmap = qrgEncoder.encodeAsBitmap(); // Setting Bitmap to ImageView qrImage.setImageBitmap(bitmap); } catch (WriterException e) { Log.v(TAG, e.toString()); } Save QR Code as Image // Save with location, value, bitmap returned and type of Image(JPG/PNG). QRGSaver.save(s...

How to Perform Rest API using Retrofit in Android (Part-1)

In this post, I will show you How to use Retrofit in Android. Retrofit is a new born baby of web services such as AsyncTask, JSONParsing and Volley. This post is Split into Two Parts. First Part Contains Architecture of Retrofit and How to create MySQL DB and PHP Scripts for Basic Operations. Second Part Contains how to perform Retrofit Operations in Android. Architecture of Retrofit Web Service We need 3 Things for Complete Retrofit Architecture. RestAdapter An Interface with all networking methods and parameters. Getter Setter Class to save data coming from server. Project Structure: Create MySQL DataBase and PHP Scripts. Following image shows my database structure. PHP Scripts: I created db_config.php which contains the script to connect DB. <?php /** * Database config variables */ define("DB_HOST", "localhost"); define("DB_USER", "root"); define("DB_PASSWORD", ""); define("DB_DATABASE", "retrofit_exampl...