Langsung ke konten utama

Android Place Picker API


Hello guys, today we gonna learn one of the greatest API for android provide by Google is called Place Picker API. This API is used to Pick Place from Google Maps Application without any Map Integration. 

The PlacePicker provides a UI dialog that displays an interactive map and a list of nearby places, including places corresponding to geographical addresses and local businesses. Users can choose a place, and your app can then retrieve the details of the selected place. 

Project Setup

You should follow the steps as proceeded below

Step 1 - Get Your SHA1 Key

For using Google Places API, We need to know SHA1 Key, which is used in Google Developer Console. You can get your SHA1 Key using Command Prompt.
keytool -list -v -keystore "%USERPROFILE%\.android\debug.keystore" -alias androiddebugkey -storepass android -keypass android

Step 2 - Enable Google Places API in Developer Console

  1. Open Google Console Site.
  2. Create New Project or You can use your Existing Project.
  3. Go to Dashboard and click Enable API.
  4. Click Google Places API for Android and Select Enable 
  5. Create new API Key, which is used later.

Step 3 - Coding Part

1. Add google play service library dependency in your app level build.gradle file. Here, I used the following dependency. You can change as per your Android SDK.
compile 'com.google.android.gms:play-services:9.2.0'
2. Put your API key in the AndroidManifest.xml file in this way inside the Application tag.
<meta-data
android:name="com.google.android.geo.API_KEY"
android:value="Your_API_Key"/>
you also need to have these permissions declared in your manifest file.
<uses-permission android:name="android.permission.ACCESS_COARSE_LOCATION" />
<uses-permission android:name="android.permission.ACCESS_FINE_LOCATION" />
<uses-permission android:name="android.permission.INTERNET" />
3. Add the following snippets in your Activity/Fragment.
  • Declare Google API Client
private GoogleApiClient mGoogleApiClient;
private int PLACE_PICKER_REQUEST = 1;
  • In the onCreate method of the Activity initialize the GoogleApiClient.
mGoogleApiClient = new GoogleApiClient
.Builder(this)
.addApi(Places.GEO_DATA_API)
.addApi(Places.PLACE_DETECTION_API)
.enableAutoManage(this, this)
.build();


  • Implement the onStart and OnStop method and do the client connection task.
    @Override
    protected void onStart() {
    super.onStart();
    mGoogleApiClient.connect();
    }

    @Override
    protected void onStop() {
    mGoogleApiClient.disconnect();
    super.onStop();
    }
  • Start Place Picker Intent using the following snippet.
    PlacePicker.IntentBuilder builder = new PlacePicker.IntentBuilder();
    try {
    startActivityForResult(builder.build(MainActivity.this), PLACE_PICKER_REQUEST);
    } catch (GooglePlayServicesRepairableException | GooglePlayServicesNotAvailableException e) {
    e.printStackTrace();
    }
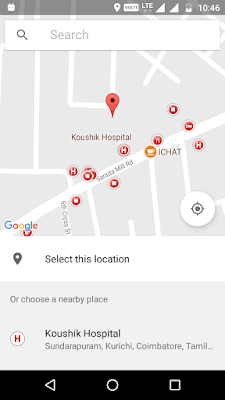
    After this, you will get Google Maps Screen like below. It has an interactive map and a list of nearby places, including places corresponding to geographical addresses and local businesses. Users can choose a place, and your app can then retrieve the details of the selected place.


  • Place Picker Map
    Place Picker Map Screen 


  • The Details can be retrieved in OnActivityResultMethod of your Activity.
    @Override
    protected void onActivityResult(int requestCode, int resultCode, Intent data) {
    if (requestCode == PLACE_PICKER_REQUEST) {
    if (resultCode == RESULT_OK) {
    Place place = PlacePicker.getPlace(data, this);
    StringBuilder stBuilder = new StringBuilder();
    String placename = String.format("%s", place.getName());
    String latitude = String.valueOf(place.getLatLng().latitude);
    String longitude = String.valueOf(place.getLatLng().longitude);
    String address = String.format("%s", place.getAddress());
    stBuilder.append("Name: ");
    stBuilder.append(placename);
    stBuilder.append("\n");
    stBuilder.append("Latitude: ");
    stBuilder.append(latitude);
    stBuilder.append("\n");
    stBuilder.append("Logitude: ");
    stBuilder.append(longitude);
    stBuilder.append("\n");
    stBuilder.append("Address: ");
    stBuilder.append(address);
    tvPlaceDetails.setText(stBuilder.toString());
    }
    }
    }
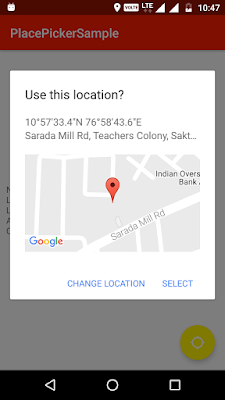
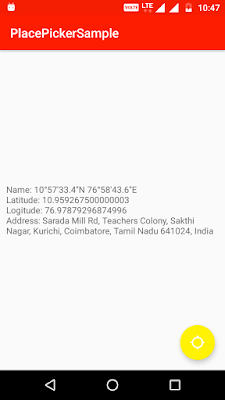
  • The Following Screenshot shows the result of Place Picker API

  • Place Picker Map Dialog
    Place Picker Dialog 
    Place Picker Map Result
    Result Screen

    Download Code:

    You can download the full source from the following Github link. If you Like this tutorial, Please star it in Github.
        
    Download From Github

    Post your doubts and comments in the comments section.  

    Komentar

    Postingan populer dari blog ini

    FlatBuffers Android Tutorial

    FlatBuffers is an efficient cross platform serialization library for C++, Java, C#, Go, Python and JavaScript. It was originally created at Google for game development and other performance-critical applications. FlatBuffers is Open Source (Apache license V2) and available on GitHub . It's currently used by:   Cocos2d-x , the open source mobile game engine and used to serialize the game data. Facebook uses it for client-server communication in the Android app (see the article) . Fun Propulsion Labs at Google in most of libraries and games. Solution overview  The schema will be defind in JSON format, then it will be converted to FlatBuffer format outside the application The Java classes of the Data model will be generated manually using flatc (FlatBuffer compiler) Step 1: Build FlatBuffers Download the source code in Google’s flatbuffers repository .  The build process is described on Google's documentation FlatBuffers Building .  On MacOS for example: Open the ...

    Android Tutorial: Use LeakCanary to detect memory leaks

    Overview The memory leak can be a headache to detect and to resolve, small memory leaks can be hidden and may be seen after a long usage of the application and hunting memory leaks is not a simple task. In this tutorial we will create a leaked application and we will use the LeakCanary library to detect the memory leak. Step 1: add the LeakCanary dependency to the application Modify the app/build.gradle to add the LeakCanary dependency as follows: Step 2: Extend and configure the Application class We need to call LeakCanary.install in onCreate method: Step 3: Create a leaked activity For this we will create a singleton class that saves the context: Then, the main activity (leaked one), will use the singleton and then we'll go to a new activity: Then, in the new activity we'll call System.gc to force the garbage collector in order to accelerate the analysis. Step 4: Retrieve the analysis result A nice notification can be shown: The result can be retrieved from logcat: Source c...

    Download file using Okio in Android

    Okio is a library that complements java.io and java.nio to make it much easier to access, store, and process your data. Simply Okio is a modern I/O API for Java.  In this post, we will see how to download image or any file using Okio. Okio is component for OkHttp Coding Part Create a new project in Android Studio. Add following dependencies to your  app-level  build.gradle  file. compile 'com.squareup.okhttp3:okhttp:3.6.0' Don't forget to add the following permission in your AndroidManifest.xml <uses-permission android:name="android.permission.INTERNET"/> <uses-permission android:name="android.permission.WRITE_EXTERNAL_STORAGE"/> Implementation Paste the following code in your Activity and Here, I have kept as MainActivity.java public void downloadImg(View view) { try { Request request = new Request.Builder() .url(imageLink) .build(); new OkHttpClient().newCall(request).enqueue(new Callback() { @Override public void onFail...